The OData (Open Data Protocol) standard defines a set of best practices for building and consuming REST APIs. Pyramid can consume this standardized data from an OData service URL, if you set up and configure an OData Source in your Data Flow definition.
It is important to note that your OData service URL can target all entities (a standard URL) or can be a Query that points to specific entities and makes use of the selection and manipulation options supported by the standard (filter, join, and so on).
Adding an OData Source
Before you begin
Before you can model the OData Source, providing Pyramid with the details it needs to connect to it, it must already be set up and accessible using a URL.
Adding OData to your Data Flow
From the Data Flow page:
- Drag and drop the OData node from Other Sources onto the Data Flow canvas (purple arrow).
- Select the node on the canvas.
- Specify the details of your OData Source in the Properties panel.
- Once you have set the properties in the OData Source panel, you will need to click OK to save your settings.
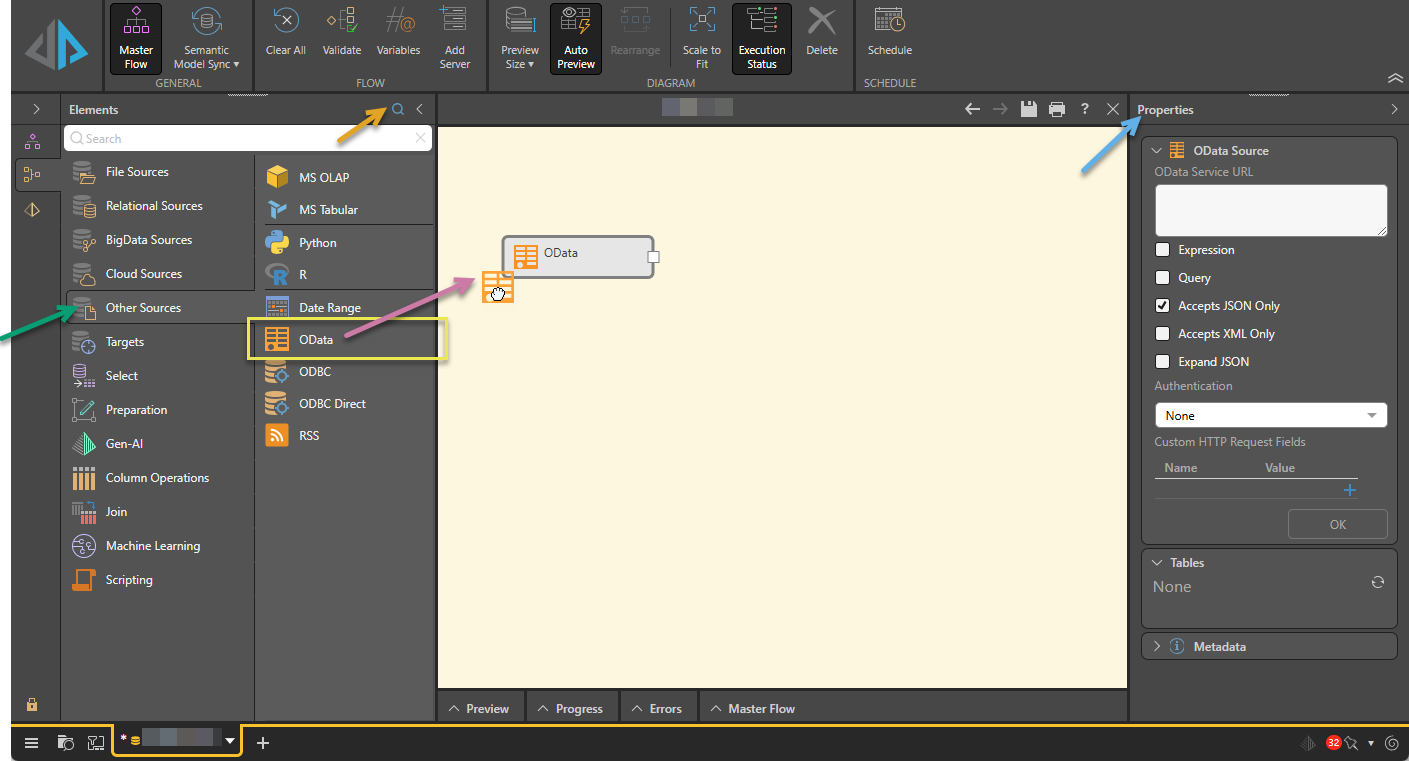
Tip: You can either navigate to the data source in the tree or, alternatively, search for it by name using the Search facility at the top of the Elements panel (orange arrow).
The Properties panel for the selected OData node opens to the right (blue arrow).
For details of the properties for OData, see below.
This stores the OData Source details and connects to the service. It also makes the values read-only in this view.
Once you have specified your details, you should save your data flow.
What next?
Once you have created your data source, you should add more nodes to your Data Flow:
- Add Tables - Set up tables from the data source.
- Add a Target - Set up the target destination to store the processed data.
- Add other nodes to prepare and manipulate the data - This includes preparation (applying formulas to the data), transforming your data automatically using an LLM (Gen-AI) or Machine Learning, manipulating the content of your tables (performing column operations and joining tables), or using R or Python scripts.
Edit your OData properties
After the data source has been created, the items in the OData Source panel are shown in the read-only state. If you want to edit these details, you need to click the Edit button at the bottom of the panel to make them editable.
OData Source Properties panel
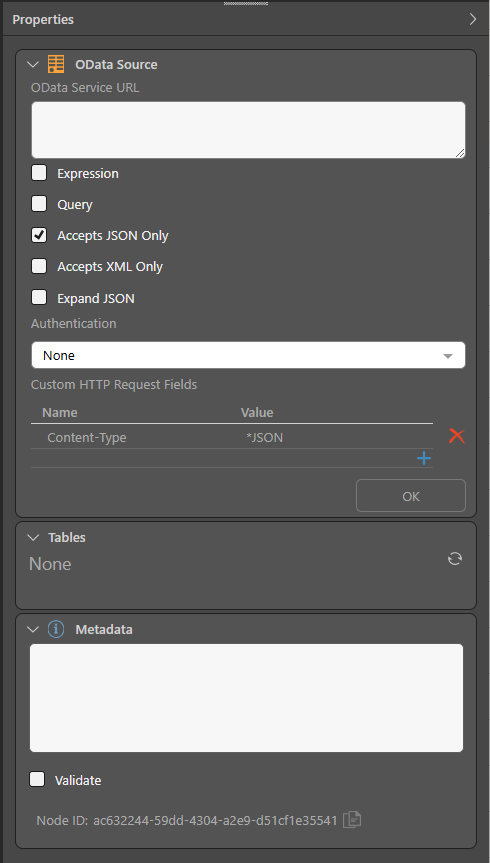
OData Source
OData service URL
Enter your OData Service URL. This can be:
- A full URL, which targets all entities. This must include the schema (http / https).
- A query, which targets specific entities and can make use of the selection and manipulation options supported by the standard (filter, join, and so on) to further limit or target the connection.
Note: If you are using a URL with an HTTPS (HTTP Secure) schema, you may need to add a certificate for the target address to Pyramid's list of certificates. Administrators can use the Admin Console's Certificate Manager to add a certificate. For more information, see Certificate Manager in the Admin Console.
Expression
If you want to use a dynamic URL to connect to your data source; for example, you want to inject values from variables into the URL whenever the connection is made; you need to select the Expression checkbox and then use the PQL editor to build your custom expression. Where this option is selected, the PQL icon is shown in the URL field. Click the PQL icon to open the PQL editor, where you can write your PQL expression.
- Click here to review documentation of the PQL Common functions.
- Click here to learn more about the PQL editor.
- Click here to learn about PQL syntax.
Query
If you want to use a Query to connect to your data source; for example, you only want to target Airline data and apply a filter; you need to select the Query checkbox and paste your query into the OData service URL field. The query structure is defined by the standard.
Payload language
Specify the expected language of the payload:
- Select the Accepts JSON Only if your OData Source uses JSON.
- Select the Accepts XML Only if your OData Source uses XML.
- Clear both checkboxes to accept any supported payload (JSON or XML).
Expand JSON
If complex properties are returned, then you should select the Expand JSON checkbox to return the complex properties as columns.
Authentication
Choose the required method of authentication from the Authentication dropdown list:
- None: No authentication required.
- Basic Authentication: Enter the authentication username and password.
- Custom Authorization Header: Enter an authorization HTTP header value.
Note: The relevant authentication method is typically dictated by your organization. As an alternative, you can specify an authorization header using the Custom HTTP Request Fields.
Custom HTTP Request Fields
You can add HTTP request fields using the Custom HTTP Request Fields control. You would use this if, for example, you want to call an API that requires authorization and need to add an Authorization request field to your header. Note that the expression can either be simple or can be dynamic, using PQL to build the expression value:
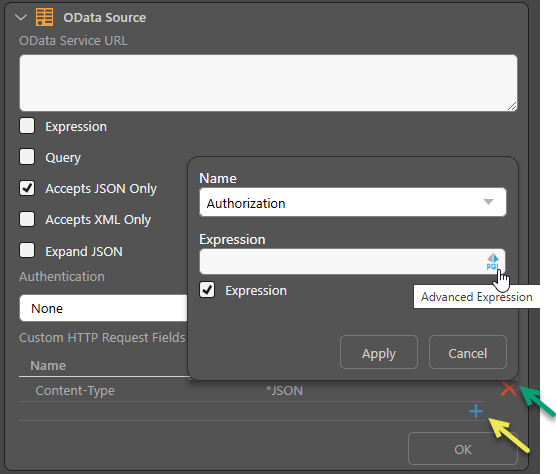
Delete a Request Field
Click Delete alongside the Request Field (green arrow above) to delete each item.
OK / Edit
The button at the bottom of the OData Source panel can be:
- OK: Shown when you first create your OData Source in Pyramid or when you are editing its details, you need to click OK to save your settings and test the connection.
- Edit: Shown when you are viewing the current details of the OData Source. You can click Edit to update the OData Source details.
Tables
Once the data source details are saved, this panel shows the associated tables. You will need to add one or more of these tables to your data flow. For more information, see Select.
Metadata
Expand the Metadata panel and add the following metadata details.
Description
Add a description for this node. This is useful for keeping track of the Data Flow (ETL) process, especially if multiple users are working with the same Data Flow. The description is visible only in the Model app.
Validate
If you do not want to validate this node when you run the validation process, for example because it is under construction and temporarily contains some invalid scripting, you can clear the selection of the Validate checkbox. Recommended: Always leave the Validate checkbox selected.
Node ID
The unique ID for this node. Click the Copy icon to copy this ID to your clipboard.
Examples
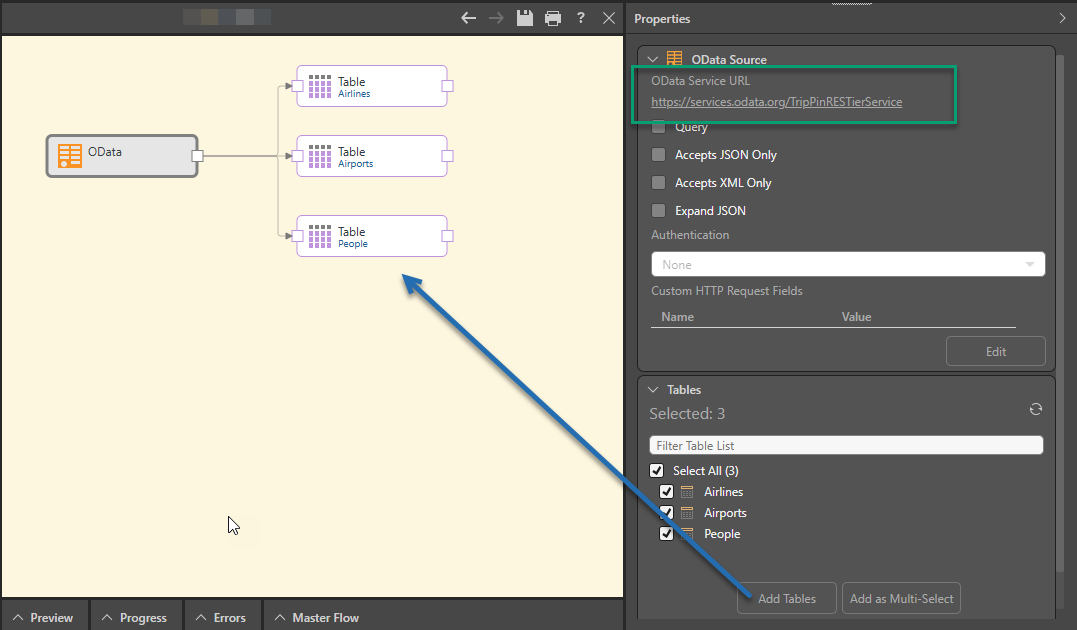
In this example, Pyramid connects to an OData source (green highlight below) that includes both JSON and XML, so neither language is specified.
Note: All tables from the source are added to the data flow (blue highlight) as table nodes.
Related information
In addition to using OData as a data source, you can also create an OData Feed that effectively makes Pyramid into a data source for another client technology that consumes data (such as Microsoft Excel). For more information, see OData Feed for Pros.